Learning Different Types Of Deployments Strategies In Kubernetes
Setup
- Open cloudshell
- Set your working Google Cloud zone by running the following command, substituting the local zone as us-central1-a:
gcloud config set compute/zone us-central1-a
- Get the sample code for creating and running containers and deployments:
git clone https://github.com/webmagicinformatica/Managing-Deployments-Using-Kubernetes-Engine.git
- Create a cluster with five n1-standard-1 nodes (this will take a few minutes to complete):
gcloud container clusters create bootcamp --num-nodes 5 --scopes "https://www.googleapis.com/auth/projecthosting,storage-rw"
Learn about the deployment object
- Let’s get started with Deployments. First let’s take a look at the Deployment object. The explain command in kubectl can tell us about the Deployment object.
kubectl explain deployment
- We can also see all of the fields using the –recursive option.
kubectl explain deployment --recursive
- You can use the explain command as you go through the lab to help you understand the structure of a Deployment object and understand what the individual fields do.
kubectl explain deployment.metadata.name
Create a deployment
- Update the deployments/auth.yaml configuration file:
vi deployments/auth.yaml
- Start the editor:
i
- Change the image in the containers section of the Deployment to the following:
...containers:- name: authimage: "kelseyhightower/auth:1.0.0"... - Save the auth.yaml file: press <Esc> then type:
:wq
- Press <Enter>. Now let’s create a simple deployment. Examine the deployment configuration file:
cat deployments/auth.yam
- Go ahead and create your deployment object using kubectl create:
kubectl create -f deployments/auth.yaml
- Once you have created the Deployment, you can verify that it was created.
kubectl get deployments
- Once the deployment is created, Kubernetes will create a ReplicaSet for the Deployment. We can verify that a ReplicaSet was created for our Deployment:
kubectl get replicasets
We should see a ReplicaSet with a name like auth-xxxxxxx
- Finally, we can view the Pods that were created as part of our Deployment. The single Pod is created by the Kubernetes when the ReplicaSet is created.
kubectl get pods
- It’s time to create a service for our auth deployment. You’ve already seen service manifest files, so we won’t go into the details here. Use the kubectl create command to create the auth service.
kubectl create -f services/auth.yaml
- Now, do the same thing to create and expose the hello Deployment.
kubectl create -f deployments/hello.yaml
kubectl create -f services/hello.yaml
- And one more time to create and expose the frontend Deployment.
kubectl create secret generic tls-certs --from-file tls/
kubectl create configmap nginx-frontend-conf --from-file=nginx/frontend.conf
kubectl create -f deployments/frontend.yaml
kubectl create -f services/frontend.yaml
- Interact with the frontend by grabbing its external IP and then curling to it.
kubectl get services frontend
curl -ks https://<EXTERNAL-IP>
And you get the hello response back.
- You can also use the output templating feature of kubectl to use curl as a one-liner:
curl -ks https://`kubectl get svc frontend -o=jsonpath="{.status.loadBalancer.ingress[0].ip}"`
Scale a Deployment
- Now that we have a Deployment created, we can scale it. Do this by updating the spec.replicas field. You can look at an explanation of this field using the kubectl explain command again.
kubectl explain deployment.spec.replicas
- The replicas field can be most easily updated using the kubectl scale command:
kubectl scale deployment hello --replicas=5
- After the Deployment is updated, Kubernetes will automatically update the associated ReplicaSet and start new Pods to make the total number of Pods equal 5.
Verify that there are now 5 hello Pods running:kubectl get pods | grep hello- | wc -l
- Now scale back the application:
kubectl scale deployment hello --replicas=3
- Again, verify that you have the correct number of Pods.
kubectl get pods | grep hello- | wc -l
You learned about Kubernetes deployments and how to manage & scale a group of Pods.
Rolling update
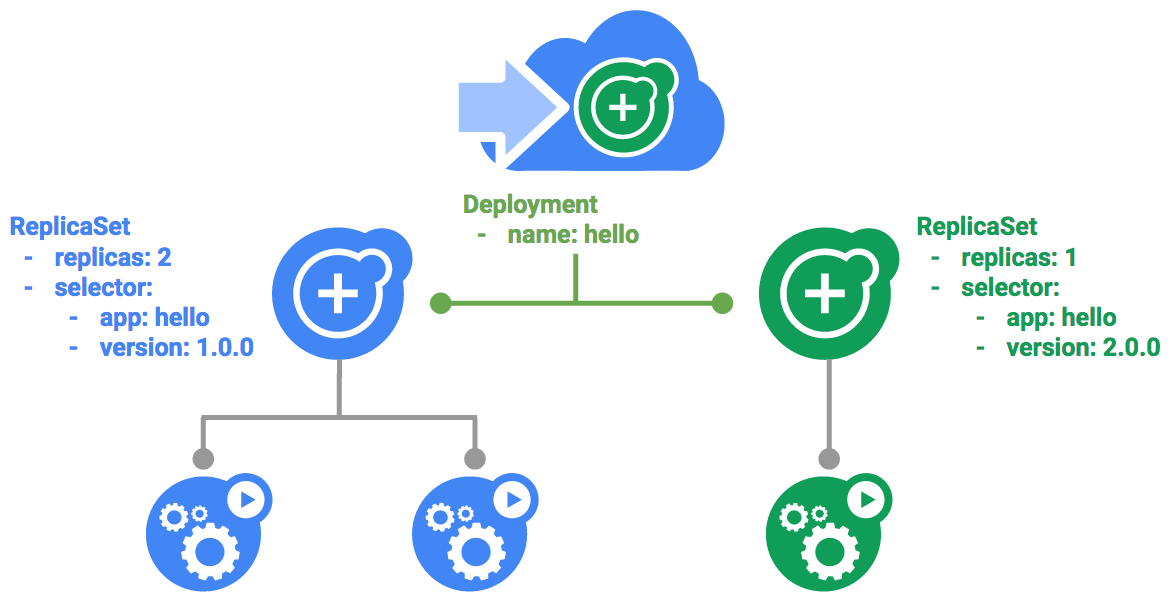
Deployments support updating images to a new version through a rolling update mechanism. When a Deployment is updated with a new version, it creates a new ReplicaSet and slowly increases the number of replicas in the new ReplicaSet as it decreases the replicas in the old ReplicaSet.
- To update your Deployment, run the following command:
kubectl edit deployment hello
- Change the image in the containers section of the Deployment to the following:
...containers:image: kelseyhightower/hello:2.0.0...Save and exit.
- See the new ReplicaSet that Kubernetes creates.:
kubectl get replicaset
You can also see a new entry in the rollout history:
kubectl rollout history deployment/hello
- If you detect problems with a running rollout, pause it to stop the update. Give that a try now:
kubectl rollout pause deployment/hello
- Verify the current state of the rollout:
kubectl rollout status deployment/hello
- You can also verify this on the Pods directly:
kubectl get pods -o jsonpath --template='{range .items[*]}{.metadata.name}{"\t"}{"\t"}{.spec.containers[0].image}{"\n"}{end}' - The rollout is paused which means that some pods are at the new version and some pods are at the older version. We can continue the rollout using the resume command.
kubectl rollout resume deployment/hello
- When the rollout is complete, you should see the following when running the status command.
kubectl rollout status deployment/hello
- Use the rollout command to roll back to the previous version:
kubectl rollout undo deployment/hello
- Verify the roll back in the history:
kubectl rollout history deployment/hello
- Finally, verify that all the Pods have rolled back to their previous versions:
kubectl get pods -o jsonpath --template='{range .items[*]}{.metadata.name}{"\t"}{"\t"}{.spec.containers[0].image}{"\n"}{end}'Great! You learned about rolling updates for Kubernetes deployments and how to update applications without downtime.
Canary deployments
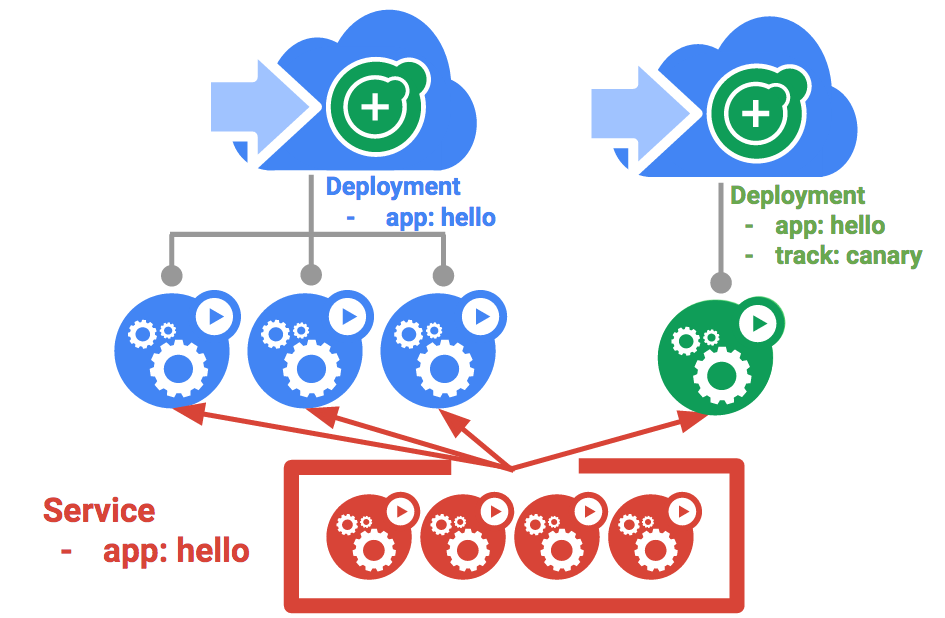
When you want to test a new deployment in production with a subset of your users, use a canary deployment. Canary deployments allow you to release a change to a small subset of your users to mitigate risk associated with new releases.
A canary deployment consists of a separate deployment with your new version and a service that targets both your normal, stable deployment as well as your canary deployment.
- First, create a new canary deployment for the new version:
cat deployments/hello-canary.yaml - Now create the canary deployment:
kubectl create -f deployments/hello-canary.yaml - After the canary deployment is created, you should have two deployments, hello and hello-canary. Verify it with this kubectl command:
kubectl get deployments
On the hello service, the selector uses the app:hello selector which will match pods in both the prod deployment and canary deployment. However, because the canary deployment has a fewer number of pods, it will be visible to fewer users.
- You can verify the hello version being served by the request:
curl -ks https://`kubectl get svc frontend -o=jsonpath="{.status.loadBalancer.ingress[0].ip}"`/versionRun this several times and you should see that some of the requests are served by hello 1.0.0 and a small subset (1/4 = 25%) are served by 2.0.0.
Blue-green deployments
Rolling updates are ideal because they allow you to deploy an application slowly with minimal overhead, minimal performance impact, and minimal downtime. There are instances where it is beneficial to modify the load balancers to point to that new version only after it has been fully deployed. In this case, blue-green deployments are the way to go.
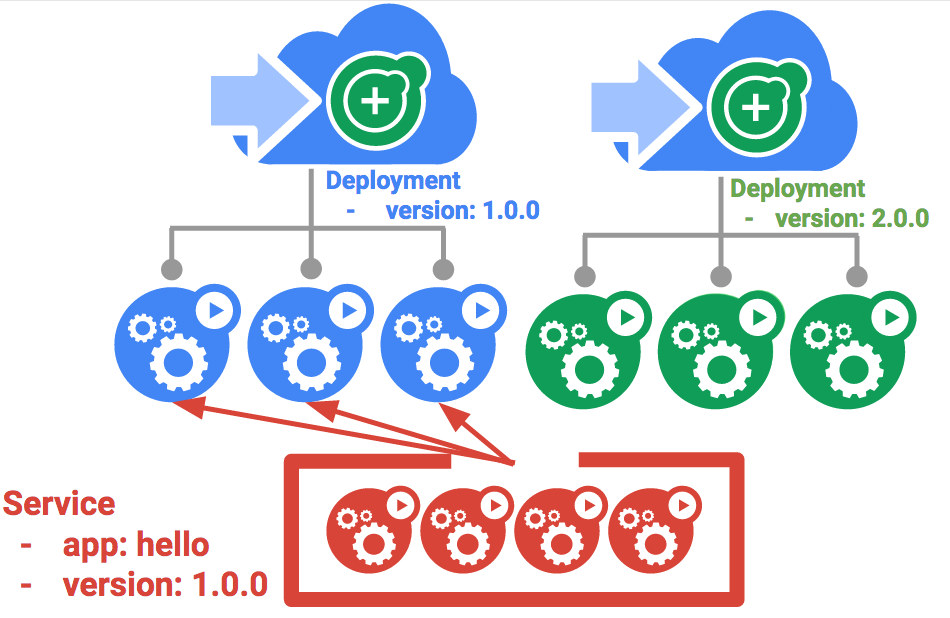
Kubernetes achieves this by creating two separate deployments; one for the old “blue” version and one for the new “green” version. Use your existing hello deployment for the “blue” version. The deployments will be accessed via a Service which will act as the router. Once the new “green” version is up and running, you’ll switch over to using that version by updating the Service.
Use the existing hello service, but update it so that it has a selector app:hello, version: 1.0.0. The selector will match the existing “blue” deployment. But it will not match the “green” deployment because it will use a different version.
- First update the service:
kubectl apply -f services/hello-blue.yaml
- Create the green deployment:
kubectl create -f deployments/hello-green.yaml
- Once you have a green deployment and it has started up properly, verify that the current version of 1.0.0 is still being used:
curl -ks https://`kubectl get svc frontend -o=jsonpath="{.status.loadBalancer.ingress[0].ip}"`/version - Now, update the service to point to the new version:
kubectl apply -f services/hello-green.yaml
- With the service is updated, the “green” deployment will be used immediately. You can now verify that the new version is always being used.
curl -ks https://`kubectl get svc frontend -o=jsonpath="{.status.loadBalancer.ingress[0].ip}"`/version - If necessary, you can roll back to the old version in the same way. While the “blue” deployment is still running, just update the service back to the old version.
kubectl apply -f services/hello-blue.yaml
- Once you have updated the service, your rollback will have been successful. Again, verify that the right version is now being used:
curl -ks https://`kubectl get svc frontend -o=jsonpath="{.status.loadBalancer.ingress[0].ip}"`/versionYou did it! You learned about blue-green deployments and how to deploy updates to applications that need to switch versions all at once.
Tag:Kubernetes


