Create serverless logic with Azure Functions
Create a function app
- Sign in to the Azure portal using the same account you used to activate the sandbox.
- Under Azure services, select Create a resource.

The Create a resource pane appears. - In the menu, select Compute, and then select Function App in the Popular products list. The Create Function App pane appears.
- On the Basics tab, enter the following values for each setting.
Subscription: Select your subscription
Resource Group: From the dropdown list, select resource group name
Function App name: Enter a globally unique app name, which becomes part of the base URL of your service. For example, you can name it escalator functions-xxx, where you can replace xxx with your initials and a number. Valid characters are a-z, 0-9 and –
Publish Code: Runtime stack Node.js (which is the language we use to implement the function examples in this exercise).
Version: Accept default - Select Review + create, and then select Create. Deployment will take a few minutes. You’ll receive a notification when deployment is completed.
Add a function to your function app
- In the previous exercise, you deployed your function app and opened it. If it isn’t already open, you can open it from the Home page by selecting All resources, and then selecting your function app, named something like escalator-functions-xxx.
- In the Function App menu, under Functions, select Functions. The Functions pane appears. This lists any functions you defined for your function app.
- In the command bar, select Create. The Create function pane appears.
- Under Select a template, select HTTP trigger.
- Select Create. The HttpTrigger1 is created and displays in the HttpTrigger1 Function pane.
- In the Developer menu on the left, select Code + Test. The code editor opens, displaying the contents of the index.js code file for your function. The default code that the HTTP template generated appears in the following snippet.
Your function expects a name to be passed in either through the HTTP request query string, or as part of the request body. The function responds by returning the message Hello, <name>. This HTTP triggered function executed successfully., echoing back the name that was sent in the request. - From the source file dropdown list, select function.json to view the configuration of the function, which should look like the following code.
This configuration file declares that the function runs when it receives an HTTP request. The output binding declares that the response will be sent as an HTTP response.
Test the function
- Expand the Logs frame at the bottom of the trigger function pane. The log frame should start accruing trace notifications every minute.
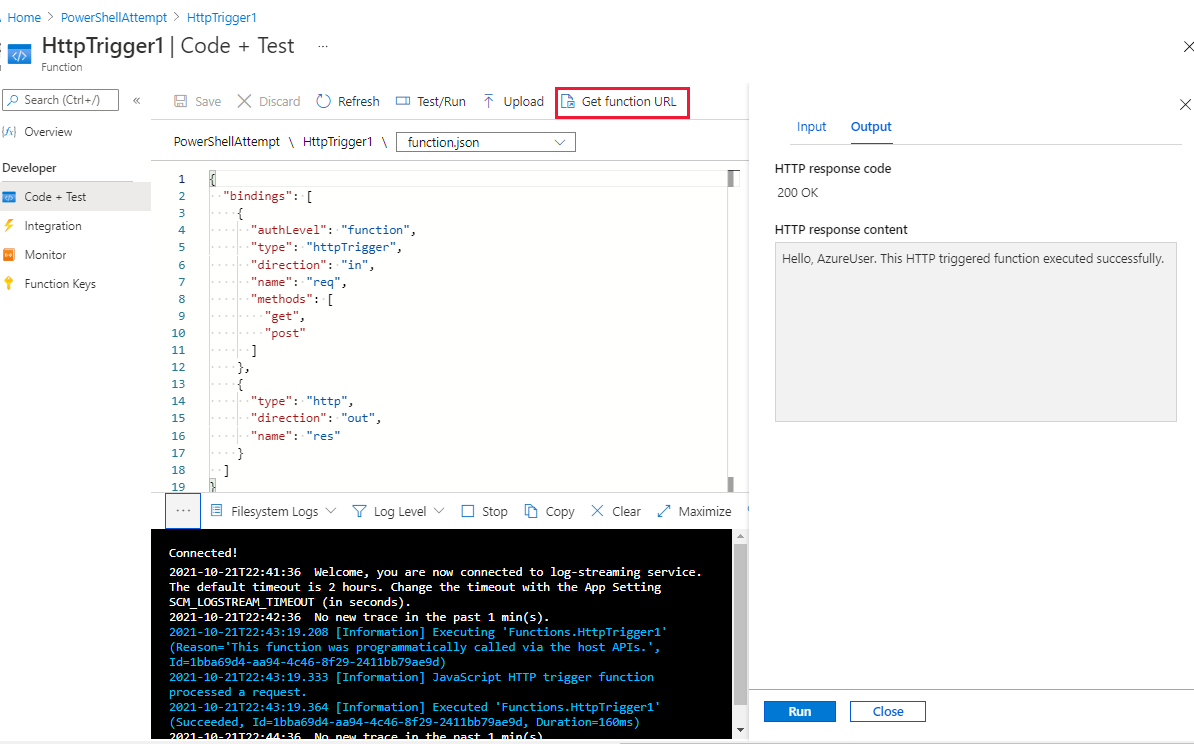
- To find the endpoint URL of the function, from the command bar, select Get function URL, as shown in the following image. Save this link by selecting the Copy to clipboard icon at the end of the URL. Store this link in Notepad or a similar app for later use.

Secure HTTP triggers
HTTP triggers let you use API keys to block unknown callers by requiring a key as part of the request. When you create a function, you select the authorization level. By default, it’s set to Function, which requires a function-specific API key, but it can also be set to Admin to use a global “master” key, or Anonymous to indicate that no key is required. You can also change the authorization level through the function properties after creation.
Because you specified Function when you created this function, you need to supply the key when you send the HTTP request. You can send it as a query string parameter named code, or as an HTTP header (preferred) named x-functions-key.
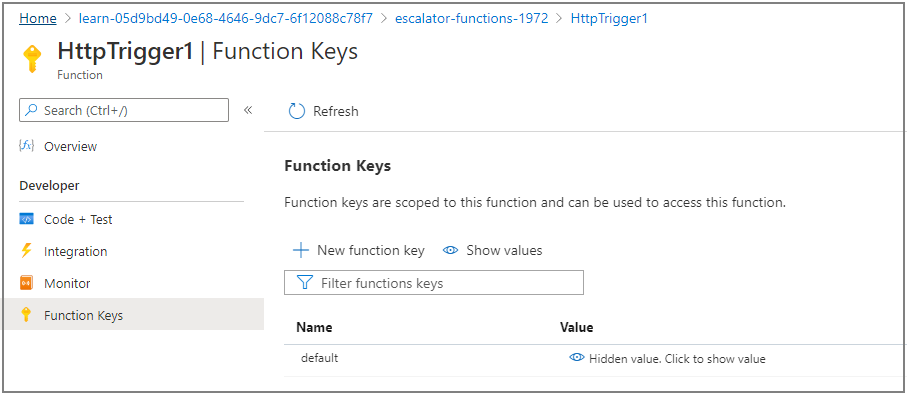
- To find the function and master keys, in the Function App menu, under Developer, select Function Keys. The Function Keys pane for your function opens.
- By default the function key value is hidden. Show the default function key value by selecting Hidden value. Click to show value in the Value. Copy the value to the clipboard, and then store this key in Notepad or a similar app for later use.

- At the bottom of the screen, scroll to the left, and select your function. At the top, under the Get Function Url section, copy your URL by selecting the Copy to clipboard icon at the end of the URL. Store this link in Notepad or a similar app for later use.
- Next, scroll to the left, and from the Function App menu, under Functions, select Functions, and then select HttpTrigger1 (or DriveGearTemperatureService for PowerShell). The HttpTrigger1 (or DriveGearTemperatureService for PowerShell) Function pane appears.
- In the left menu pane, under Developer, select Code + Test. The Code + Test pane appears for your HttpTrigger1 (or DriveGearTemperatureService for PowerShell) function.
- On the command bar, select Test/Run. A pane showing the input parameters for running a test.
- In the Body text box, overwrite the embedded code by replacing line 2 in the Body with the cURL command below, replacing
<your-function-key>with the function key value you saved, and replacing<your-https-url>with the URL of your function.curl --header "Content-Type: application/json" --header "x-functions-key: <your-function-key>" --request POST --data "{\"name\": \"Azure Function\"}" <your-https-url> - Review the cURL command and verify that it has the following values:
- Added a
Content-Typeheader value of typeapplication/json. - Passed the Function Key as the header value
x-functions-key. - Used a
POSTrequest. - Passed the Azure Function with the URL for your function.
- Added a
- Select Run.
Add business logic to the function
Let’s add the logic to the function, to check temperature readings that it receives, and set a status for each temperature reading.
Our function is expecting an array of temperature readings. The following JSON snippet is an example of the request body that we’ll send to our function. Each reading entry has an ID, timestamp, and temperature.
{
    "readings": [
        {
            "driveGearId": 1,
            "timestamp": 1534263995,
            "temperature": 23
        },
        {
            "driveGearId": 3,
            "timestamp": 1534264048,
            "temperature": 45
        },
        {
            "driveGearId": 18,
            "timestamp": 1534264050,
            "temperature": 55
        }
    ]
}
Let’s replace the default code in our function with the following code, to implement our business logic.
In the HttpTrigger1 function pane, open the index.js file, and replace it with the following code. After making this change, on the command bar, select Save to save the updates to the file.
module.exports = function (context, req) {
    context.log('Drive Gear Temperature Service triggered');
    if (req.body && req.body.readings) {
        req.body.readings.forEach(function(reading) {

            if(reading.temperature<=25) {
                reading.status = 'OK';
            } else if (reading.temperature<=50) {
                reading.status = 'CAUTION';
            } else {
                reading.status = 'DANGER'
            }
            context.log('Reading is ' + reading.status);
        });

        context.res = {
            // status: 200, /* Defaults to 200 */
            body: {
                "readings": req.body.readings
            }
        };
    }
    else {
        context.res = {
            status: 400,
            body: "Please send an array of readings in the request body"
        };
    }
    context.done();
};
The logic we added is straightforward. We iterate through the array and set the status as OK, CAUTION, or DANGER based on the value of the temperature field. We then send back the array of readings with a status field added to each entry.
Notice the Log statements when you expand Logs at the bottom of the pane. When the function runs, these statements will add messages in the Logs window.
Test our business logic
We’re going to use the Test/Run feature in Developer > Code + Test to test our function.
- In the Input tab, replace the contents of the Body text box with the following code to create our sample request.
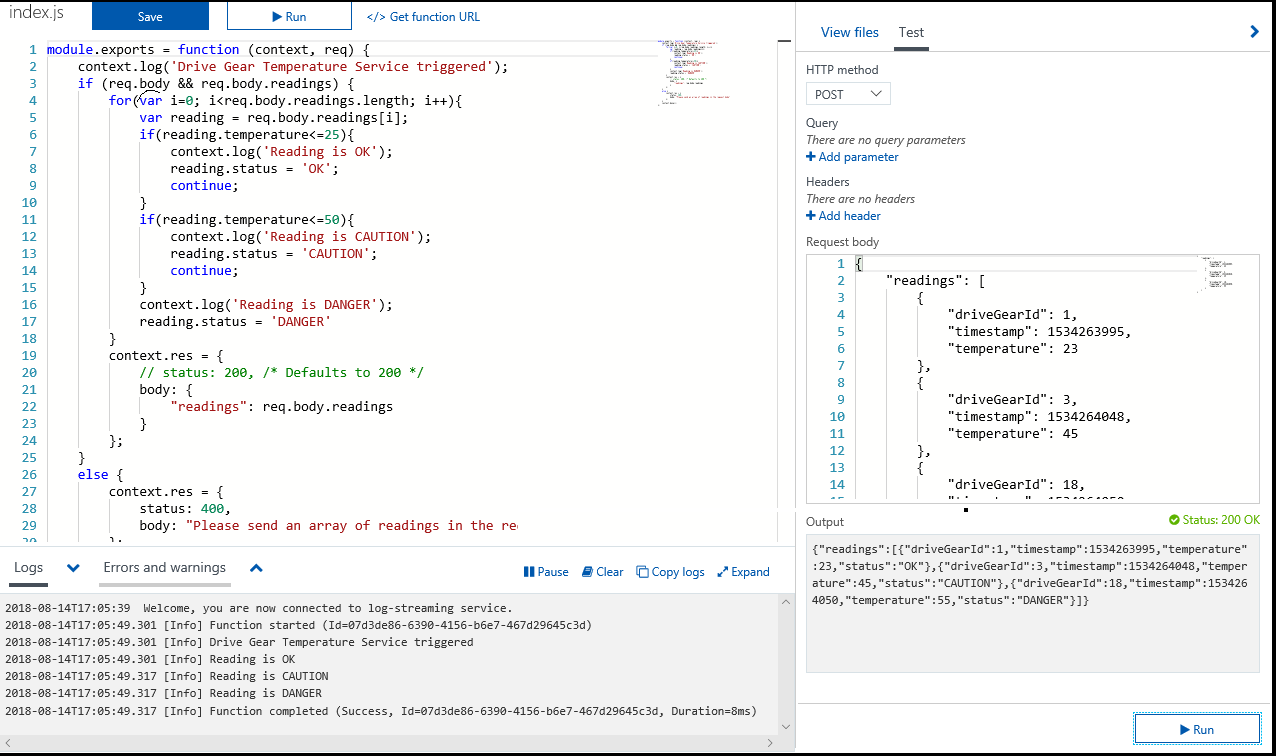
{ "readings": [ { "driveGearId": 1, "timestamp": 1534263995, "temperature": 23 }, { "driveGearId": 3, "timestamp": 1534264048, "temperature": 45 }, { "driveGearId": 18, "timestamp": 1534264050, "temperature": 55 } ] } - Select Run. The Output tab displays the HTTP response code and content. To see log messages, open the Logs tab in the bottom flyout of the pane (if it is not already open). The following image shows an example response in the output pane and messages in the Logs pane.

The Output tab shows that a status field has been correctly added to each of the readings. - In the Developer menu on the left, select Monitor to see that the request has been logged to Application Insights. The Monitor pane appears for your function.
- Select Configure. The Application Insights pane appears for your trigger function.
- Select Create new resource, and in the New resource name field, select your function app, and in the Location field, select the region you initially associated with your function app.
- Select OK.
Tag:Azure
